The IKEA Vadholma kitchen island has become one of the most popular freestanding kitchen solutions for homeowners looking to add workspace, storage, and character without committing to a full renovation. Unlike built-in islands that require contractors and permits, the Vadholma rolls into place and gets to work immediately. Its industrial aesthetic, think oak butcher block top, black steel frame, and open shelving, fits everything from modern farmhouse to urban loft kitchens. But beyond the looks, this island delivers serious function for under $600. Whether someone’s prepping a meal in a cramped apartment galley or anchoring a sprawling open-concept kitchen, the Vadholma adapts. This guide covers assembly, styling strategies, and maintenance tips to help anyone get the most out of this hardworking piece.
Table of Contents
ToggleKey Takeaways
- The Vadholma kitchen island combines portability with the scale of a built-in island, offering a solid oak butcher block top and industrial steel frame for under $600, making it ideal for renters or those avoiding permanent kitchen modifications.
- Measuring roughly 49.6″ × 31.1″ × 35.4″ with lockable casters and open shelving on three sides, the Vadholma adapts to any kitchen layout—from small galley kitchens to sprawling open-concept spaces.
- Assembly takes 60 to 90 minutes with two people and basic tools; the key to success is checking caster locks, aligning drawers properly, and tightening the butcher block top in a cross pattern to avoid warping.
- The oak butcher block surface requires regular maintenance with mineral oil every 4-6 weeks initially, light sanding for knife marks, and trivets under hot pans to prevent staining and warping.
- Style the Vadholma to match your kitchen aesthetic—pair with copper accents in industrial spaces, woven baskets in transitional kitchens, or Edison bulbs in modern farmhouse settings—and customize with pegboards, magnetic knife strips, or seasonal storage rotation for maximum functionality.
What Makes the Vadholma Kitchen Island Stand Out
The Vadholma’s biggest advantage is its hybrid design: it blends the portability of a kitchen cart with the scale and storage of a built-in island. The solid oak butcher block top is the headline feature, it’s a genuine work surface that can handle knife work, dough rolling, and hot pans (with trivets). Unlike laminate-topped islands, this one ages with character.
The powder-coated steel frame gives it an industrial edge that contrasts nicely with the warm wood. It’s sturdy enough to lean on while chopping, but light enough to reposition when rearranging the kitchen. Lockable casters mean it can roll out for serving or cleaning, then lock into place for daily use.
Open shelving on three sides offers visible storage for cookware, mixing bowls, or small appliances. There’s no wasted space behind cabinet doors, everything stays within arm’s reach. Two drawers with soft-close hardware hold utensils, towels, or spices. A built-in towel bar and stemware rack add finishing touches that separate the Vadholma from generic utility carts.
For renters or anyone avoiding permanent modifications, this island delivers the function of built-in cabinetry without anchoring to the floor or cutting into countertops. It’s also code-compliant in most jurisdictions since it doesn’t require electrical or plumbing work.
Key Features and Specifications You Should Know
Dimensions, Materials, and Storage Capacity
The Vadholma measures 126 cm wide × 79 cm deep × 90 cm high (roughly 49 5/8″ × 31 1/8″ × 35 3/8″). That footprint is large enough to serve as a true island, not just a cart, but still fits through standard doorways for delivery.
The oak butcher block top is approximately 1 1/8″ thick and arrives pre-treated with mineral oil. It’s solid wood, not veneer over particleboard. Expect some natural color variation between boards, that’s normal for oak and adds warmth. The surface is end-grain oriented for durability but will show knife marks over time. Plan to sand and re-oil it annually if used heavily.
The steel frame and shelves are powder-coated in black. Shelves are perforated, which helps with airflow but means crumbs can fall through. Each shelf holds approximately 33 lbs, adequate for stacked mixing bowls, small appliances, or a stand mixer. The two drawers measure roughly 11″ deep and run on smooth glides with soft-close dampers.
Casters are lockable and rated for the island’s total weight plus contents. They’re about 2″ tall, so factor that into overall height when considering clearance under low-hanging lights or cabinets.
Total assembly weight is around 110 lbs when fully loaded. That’s manageable for two people to reposition, but not something to drag solo across tile without scratching the floor.
One quirk: the stemware rack holds roughly eight to ten wine glasses, depending on bowl diameter. It’s a nice touch for entertaining but won’t replace a full wine glass collection.
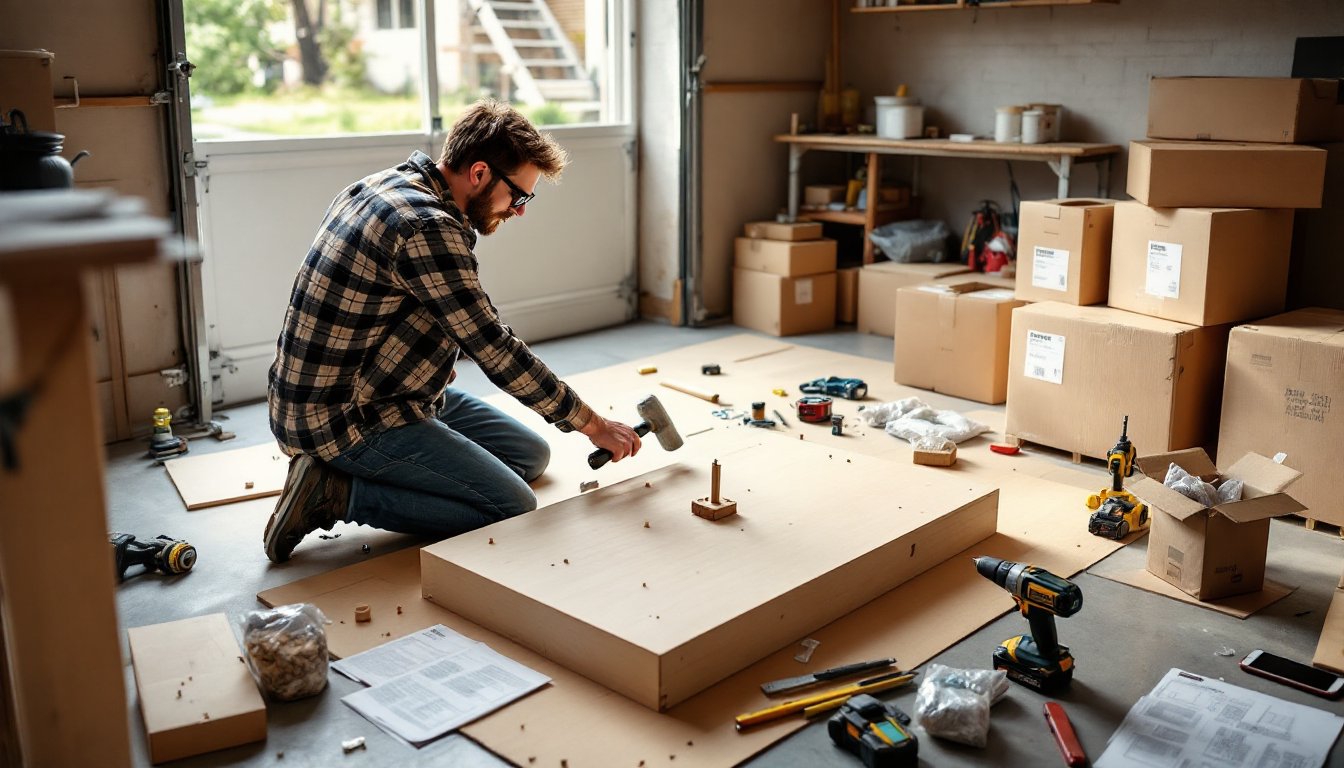
How to Assemble and Install Your Vadholma Island
Tools needed: Phillips screwdriver, rubber mallet (or hammer with a wood block), adjustable wrench, and a second person. IKEA includes an Allen key, but a cordless drill with a hex bit speeds things up.
Materials: All hardware comes in the box. Check the parts list immediately, missing bolts are easier to replace before assembly.
Safety: Wear safety glasses when hammering dowels. The island is top-heavy during assembly, so work on a flat, stable surface.
Step-by-step assembly:
-
Unpack and inventory. Lay out all parts and group hardware by type. The instruction manual uses pictograms, label bags with tape if needed.
-
Assemble the steel frame. Start with the side panels and shelves. Bolts thread into pre-drilled holes: don’t overtighten until the entire frame is together. Square the frame by measuring diagonally corner-to-corner, both measurements should match within 1/8″.
-
Attach the casters. Each caster mounts with four bolts. Make sure the locking mechanisms face outward for easy access. Test the locks before proceeding, if one sticks, loosen and re-tighten the bolts slightly.
-
Install drawer slides. These mount inside the frame. Follow the manual’s spacing exactly or drawers won’t align. Soft-close dampers clip onto the slides after the drawer boxes are assembled.
-
Assemble and insert drawers. The drawer boxes use cam locks and dowels. Tap dowels flush with a mallet. Slide drawers into place and check that they close smoothly. Adjust slide position if needed.
-
Attach the butcher block top. This is a two-person job, the top weighs about 35 lbs. Bolts thread up from underneath through the frame. Tighten evenly in a cross pattern to avoid warping the mounting brackets.
-
Add the towel bar and stemware rack. These screw into pre-drilled holes on the sides. Use a level to ensure the stemware rack is straight, nobody wants crooked wine glasses.
Time estimate: Plan for 60 to 90 minutes with two people. Rushing leads to misaligned drawers or wobbly casters.
Pro tip: Once assembled, flip the island upside down (carefully) and apply furniture felt pads to the bottom of each caster. This prevents floor scratches when repositioning, even with the locks engaged.
Creative Styling Ideas for Different Kitchen Layouts
The Vadholma’s industrial vibe adapts to multiple design styles. In modern farmhouse kitchens, pair it with open shelving, white subway tile, and matte black fixtures. The oak top echoes farmhouse tables, while the steel frame keeps it contemporary.
For urban loft or industrial spaces, lean into the metal. Hang copper pots from a ceiling rack above the island, stack vintage enamelware on the shelves, and add Edison bulb pendants. The black frame becomes a focal point rather than an accent.
In transitional kitchens with shaker cabinets and neutral palettes, the Vadholma bridges traditional and modern. Style the shelves with woven baskets in neutral tones (seagrass or rattan) to soften the industrial edge. Keep the top clear except for a cutting board and a small potted herb like basil or thyme.
Many DIYers inspired by IKEA furniture modifications customize the Vadholma further. Some add a pegboard panel to one end for hanging tools, others mount a paper towel holder or install hooks for aprons and oven mitts. Since the frame is steel, magnetic knife strips and spice jars stick directly to the sides, an easy hack that doesn’t require drilling.
Small Kitchen Hacks and Space Optimization
In small kitchens, the Vadholma can actually create more usable space if positioned thoughtfully. Place it perpendicular to the counter to form an L-shaped work zone, keeping the sink, stove, and island within a compact work triangle. This layout, often recommended in kitchen design ideas, maximizes efficiency without overcrowding.
Use the shelves strategically: bottom shelf for heavy items like a cast iron Dutch oven or stand mixer, middle shelf for everyday bowls and cutting boards, top shelf for lighter items like serving platters or cookbooks. Store items you use together (baking supplies, coffee station gear) on the same shelf to minimize movement.
If counter space is scarce, keep the butcher block top mostly clear and use it as overflow prep area. A foldable dish rack can sit on top temporarily, then collapse and slide into a drawer when not needed.
For narrow galley kitchens, position the island against one wall rather than in the center. It becomes a console-style workspace with access from three sides. This works especially well if the kitchen opens to a dining area, the island becomes a serving station and visual divider.
Another small-space trick: swap out items seasonally. Store holiday baking gear on the shelves in December, grilling tools in summer. Rotate stock to keep the most-used items accessible.
Maintenance Tips to Keep Your Island Looking New
The oak butcher block top requires the most attention. Mineral oil is the go-to treatment, it’s food-safe and prevents the wood from drying out. Apply a generous coat every four to six weeks for the first six months, then every three to four months after that. Wipe off excess after 20 minutes and buff with a clean cloth.
For deeper conditioning, use a beeswax and mineral oil blend (often sold as butcher block conditioner). This adds a slight water resistance and enhances the grain. Never use vegetable or olive oil, they go rancid.
To remove knife marks or stains, sand lightly with 120-grit sandpaper, following the wood grain. Wipe away dust, then re-oil immediately. For stubborn stains, make a paste of baking soda and water, rub gently, and rinse.
Avoid setting hot pans directly on the wood, even briefly. Use trivets or silicone mats. Don’t let water pool, oak is porous and will stain or warp if saturated.
The steel frame and shelves clean up easily with a damp microfiber cloth and mild dish soap. For grease buildup, use a degreaser or a 50/50 mix of white vinegar and water. Dry immediately to prevent water spots. Avoid abrasive cleaners or steel wool, they’ll scratch the powder coating.
If the powder coat chips (usually from impact), touch up with a small brush and black enamel paint. Sand the chip lightly first for better adhesion.
Drawer glides and casters need occasional lubrication. Wipe dust from the slides and apply a silicone-based lubricant (not WD-40, which attracts dust). Check caster bolts every six months, they can loosen with regular movement. Tighten with a wrench if the island feels wobbly.
The stemware rack collects dust. Wipe it weekly with a damp cloth, or vacuum with a brush attachment.
For woodworking enthusiasts familiar with DIY furniture plans, maintaining the Vadholma is straightforward, treat it like any shop-built butcher block surface. The oak is forgiving and improves with age if cared for properly.
Long-term care: After a few years, the butcher block may show wear. A full refinish involves sanding down to bare wood with progressively finer grits (80, 120, 220), then re-oiling. This takes an afternoon but restores the surface completely. The steel frame, if kept clean and dry, should last decades without refinishing.